How to Use a Ceramic Vocal Steamer: A Step-by-Step Guide
Before You Use a Vocal Steamer: Set the Right Expectations
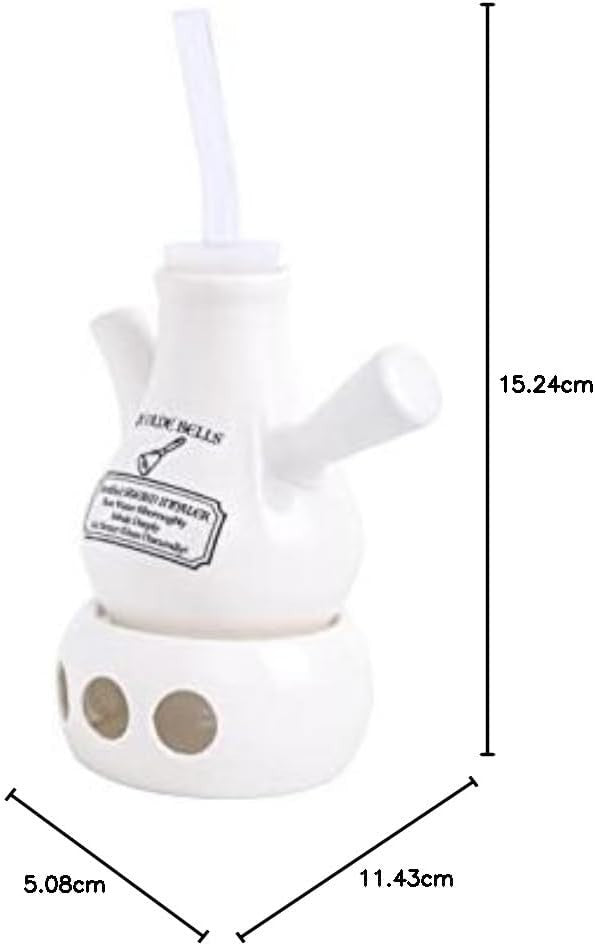
A proper ritual begins with knowing the sequence, not with making a production of it. If you have searched for how to use a ceramic steam inhaler, you may have encountered a mixture of antique objects and modern accessories. This guide concerns The Ye Olde Bells Victorian Vocal Steamer: a ceramic warm-steam set for an adult ritual. Think of it as a vocal warm-up companion and a small moment of occasion in your schedule. Just add hot (not boiling) water; an optional tealight keeps it warm for longer.
The sequence matters more than elaborate preparation. Choose a suitable place, read the supplied directions, fill with plain hot (not boiling) water, fit the stopper and mouthpiece, breathe the warm steam, optionally light a tealight underneath to keep it warm for longer, and leave enough time for everything to cool fully afterward. Keep the set's own instructions at hand for filling, assembly, and positioning details. Do not borrow those details from a different model or an antique illustration.
1. Plan the session before you begin
A session is about 5–10 minutes, with additional time needed for setup and complete cooling. Choose a moment when you can remain beside the set throughout. Avoid fitting a session into the last few minutes before leaving home. A short ritual deserves an unhurried ending as much as an unhurried beginning, particularly when warm water and an optional candle are involved.
This product is for adults 18 and older. Read the care and safety guidance before the first session and revisit it whenever you are uncertain. If your supplied instructions leave a filling or assembly detail unclear, get that detail clarified before use or lighting an optional tealight. Guesswork is not a necessary part of the heritage experience. The old-world charm is in the object; the instructions deserve a thoroughly modern reading.
2. Choose a clear, stable surface
Use a stable, heat-safe surface away from flammables, children, and pets. If you use a tealight, clear away loose paper, scores, fabric, and other items that could reach the flame. Make sure the setup does not require you to lean across the candle to reach a notebook or switch. Place everything where it can remain undisturbed for the session and the cooling period afterward.
- Choose a position away from edges and busy walking routes.
- If you use a tealight, keep sleeves and loose clothing clear of the candle.
- Arrange the space so nobody needs to move the set while it is warm.
- Keep your attention on the session rather than a separate household task.
3. Identify the parts while they are cool
The set includes a white glazed ceramic vessel with a side spout and handle, a clear glass mouthpiece through a rubber stopper, and a ceramic candle-warmer base with three round vents. Optional tealights and tweezers for the tealight are included. Before assembly, look over the pieces for visible damage. Do not use a cracked ceramic part or chipped glass mouthpiece.
Compare the arrangement with the supplied instructions; fill the vessel before fitting the stopper and mouthpiece, and assemble only as directed. Do not force the glass or improvise substitute parts. The tweezers are for the tealight; they are not a general tool for adjusting glass or moving the filled vessel. Keep all handling and assembly steps within the directions for this particular set.
4. Fill with plain warm water only
Fill with plain hot (not boiling) water, then fit the stopper and glass mouthpiece and breathe the warm steam gently through it. Never use boiling water, oils, or additives. That means leaving out fragrances, herbs, salts, and homemade mixtures, however attractive a recipe might sound. Follow the supplied instructions for the amount of water and the filling arrangement. A guide for another vessel cannot establish the correct quantity for this one.
Hot water and steam can scald. Do not assume the vessel, water, or glass is safe to touch because the session has only recently begun. Keep the setup steady, and complete filling and assembly according to the directions before proceeding. If water spills or anything needs repositioning, address the setup safely before lighting rather than working around the problem.
5. Light the candle according to the directions
Optional: light a tealight underneath to keep the water warm for longer. If you use a tealight, follow the supplied placement and lighting instructions for the tealight and ceramic base. Keep the candle attended for the entire session. Do not use extra candles, improvise a different heat source, or try to accelerate the process. The set is designed around a particular arrangement, and an improvised arrangement does not belong in a routine.
Keep the area around the three vents clear. Leave the set in place while it is in use. If you need to leave the area, extinguish the candle first rather than leaving it burning while you attend to something else. A delivery at the door can wait for a properly finished pause.
6. Keep the ritual simple
Follow the supplied directions for using and positioning the mouthpiece. Do not force a particular breathing pattern, extend the session, or pursue a stronger sensation. You can give the pause a simple focus by choosing the first task you will return to afterward. Save humming, lip trills, articulation drills, and other performance exercises for a separate moment away from the set.
About 5–10 minutes is the session length to plan around, rather than a reason to hurry setup or delay the finish. The purpose is a warm-steam ritual with a pleasing sense of occasion. You do not need to add other activities or special ingredients to make it count.
7. Extinguish, cool fully, and hand wash
If you use a tealight, extinguish it after the session. Leave the parts undisturbed until they have cooled fully before handling, disassembly, or cleaning. Do not carry a warm setup through the house or begin washing while pieces are still warm. Once fully cool, hand wash only and follow the care directions for cleaning, drying, and storage.
If this considered little sequence suits your routine, explore the Ye Olde Bells ceramic vocal steamer. The pleasure is in the object and the occasion: a ceramic heritage accessory with a clear beginning, a short pause, and a properly finished ending. Once everything is fully cool and put away, a separate cup of tea would make a fitting curtain call.
This article is general information, not medical advice; see a qualified professional, such as a voice teacher or a healthcare professional, for any concern.